Tuesday, March 4, 2014
Beeswax Candles

Whoa. Let's all be honest, this hasn't happened for a while. Well, I'm here to change that.

We're quickly running out of our (Christmas present) candle supply. Matt and I have about two candles and/or an incense stick burning at all times. Incase you haven't noticed, it's been a little snowy in Missouri this year. ([(Snow+dogs= wet dogs)=smelly house]=candles are necessary).

A while ago, I had bought some beeswax at the Tower Grove Farmer's Market (it's the best one to go to in STL- it's as local as possible). Beeswax comes in 1 pound bricks. You can also order beeswax on Amazon. There are all different shades of yellow, so pick the color you like the most because that will be the color of your candle.
 Ingredients:
- 1 lb. beeswax
- 1/2 cup coconut oil
- 3 small Jars
- Old sauce pan (don't use one that you cook food in, unless you enjoy beeswax in your food)
- Double boiler
- Candle wick
- Pencil
- Essential oil of choice
1. First, you'll need to use a double boiler to melt your wax.

 2. When the wax is melted, add the 1/2 C. coconut oil. Beeswax can get very hot, so you'll need to use coconut oil to stabilize it.
3. As you wait for the coconut oil to melt, place your one wick in each candle jar. Use a pencil to stabilize the wick and keep it up right.
4. Next, pour a small amount of wax/oil into the bottom of each jar. Press the wick bottom into the hardening wax.
 5. Once the wax is hardened, poor the remaining wax just shy of the lip of each jar, leaving about 1/2 inch of space.
6. Pour a few drops of preferred essential oil into each jar. I used lavender (duh).
7. Let the candle harden. Cleaning off any spill on the outside of the jar- you don't want it to melt onto your counter tops!


Enjoy!
Xx,
Alex
Whoa. Let's all be honest, this hasn't happened for a while. Well, I'm here to change that.
We're quickly running out of our (Christmas present) candle supply. Matt and I have about two candles and/or an incense stick burning at all times. Incase you haven't noticed, it's been a little snowy in Missouri this year. ([(Snow+dogs= wet dogs)=smelly house]=candles are necessary).
A while ago, I had bought some beeswax at the Tower Grove Farmer's Market (it's the best one to go to in STL- it's as local as possible). Beeswax comes in 1 pound bricks. You can also order beeswax on Amazon. There are all different shades of yellow, so pick the color you like the most because that will be the color of your candle.
- 1 lb. beeswax
- 1/2 cup coconut oil
- 3 small Jars
- Old sauce pan (don't use one that you cook food in, unless you enjoy beeswax in your food)
- Double boiler
- Candle wick
- Pencil
- Essential oil of choice
1. First, you'll need to use a double boiler to melt your wax.
2. When the wax is melted, add the 1/2 C. coconut oil. Beeswax can get very hot, so you'll need to use coconut oil to stabilize it.
3. As you wait for the coconut oil to melt, place your one wick in each candle jar. Use a pencil to stabilize the wick and keep it up right.
4. Next, pour a small amount of wax/oil into the bottom of each jar. Press the wick bottom into the hardening wax.
5. Once the wax is hardened, poor the remaining wax just shy of the lip of each jar, leaving about 1/2 inch of space.
6. Pour a few drops of preferred essential oil into each jar. I used lavender (duh).
7. Let the candle harden. Cleaning off any spill on the outside of the jar- you don't want it to melt onto your counter tops!
Enjoy!
Xx,
Alex
Monday, November 11, 2013
Lavender and seasame pillow
Winter is coming (sorry, I just couldn't resist).

Like most young newlyweds, we're trying to save $$$. Sure, sure we do indulge on a few splurges. But day to day we try to stay cheap. This means eating at home (which, this is aperk of living together if you ask me... home cooked meals!), using Netflix instead of cable, and skimping on the A/C and heat! The last one is the biggest deal for me. As long as I'm bundled up, it's no big deal. But the worst thing on Earth is getting into a bed with freezing cold sheets. Well, maybe getting out of bed is actually the worst. But, you understand what I'm saying.
Having my microwavable pillow has been an absolute life saver! You can buy these almost anywhere, but it really is sentimental if you make it yourself (or give a homemade one as a Christmas gift!!).
Here's how to stay warm without your heat :)
Ingredients:
- 1/2 yard of material
- Sewing machine- unless you are dying to hand stitch it
- Scissors
- Sesame seeds- about 2 pounds
- Dried lavender buds- optional
- Pencil- creating your pattern
- Ruler
First, cut your material. I created a pattern which consisted of 4 separate pieces. The pattern was about 1 foot long. It looked like this: <--->. I enjoy this pattern because it fits around my neck nicely. You can see measurements below:


Next it's time to sew. This seems like an obvious point to make, but make sure the front of your material is facing inwards. (So you're sewing on the wrong side of the material.) Align your first piece with another and sew along the edge. Leaving about 1/8 of an inch raw. Once you've pieced together all four, you'll sew the remaining open edges together. However, you must leave a hole!


Using the hole, turn the piece right side in. Next, using a funnel fill your pillow with sesame seeds and lavender buds. You're almost done!

Finally, you'll need to either hand stitch the hole together or you can just use the sewing machine again.
I decided I wanted to make a little pillow case with an old tea towel my mom had given me. Tea towels are great to use because they've been washed 1,000,000 times- so their dyes won't run at all. Plus they're super soft.


Microwave instructions:
Simple place in microwave for 4 minutes. This will insure it stays warm for about 4 hours. Place under your bedding 10 minutes before you climb in... you won't regret it!
Xx,
Alex
FallWreath
From summer to fall:

With the plan of making our apartment a home, I figured we needed a wreath. I mean, fall calls for wreaths, right? Isn't that what every girl grew up with on their front door? My mom was always really talented with creating wreaths. Good at the whole floral arrangement thing. While I love her creations, I wanted to make our wreath our own.
From making my weekly (sometimes daily) trips to my little nursery, I've recently discovered air plants. Don't have a green thumb? These are fool proof! Mist some water on these babies about once a week. Poof, you're done.
I found these wreaths in my dad's shed. Apparently he made a bunch for my mom a long time ago. So I snagged some for our front door.
As always, it's a good idea to plan ahead...
Ingredients:
- Wreath
- Fishing Wire
- Scissors
- Air plants

This was a very simple process. I just chose where I wanted to place the air plants and tied them onto my wreath. Easy peas-y.


 My front door may not be pretty, but at least there is a wreath!
Xx,
Alex
My front door may not be pretty, but at least there is a wreath!
Xx,
Alex
Thursday, September 26, 2013
Winter is coming (sorry, I just couldn't resist).

Having my microwavable pillow has been an absolute life saver! You can buy these almost anywhere, but it really is sentimental if you make it yourself (or give a homemade one as a Christmas gift!!).
Here's how to stay warm without your heat :)
Ingredients:
- 1/2 yard of material
- Sewing machine- unless you are dying to hand stitch it
- Scissors
- Sesame seeds- about 2 pounds
- Dried lavender buds- optional
- Pencil- creating your pattern
- Ruler
First, cut your material. I created a pattern which consisted of 4 separate pieces. The pattern was about 1 foot long. It looked like this: <--->. I enjoy this pattern because it fits around my neck nicely. You can see measurements below:


Next it's time to sew. This seems like an obvious point to make, but make sure the front of your material is facing inwards. (So you're sewing on the wrong side of the material.) Align your first piece with another and sew along the edge. Leaving about 1/8 of an inch raw. Once you've pieced together all four, you'll sew the remaining open edges together. However, you must leave a hole!


Using the hole, turn the piece right side in. Next, using a funnel fill your pillow with sesame seeds and lavender buds. You're almost done!

Finally, you'll need to either hand stitch the hole together or you can just use the sewing machine again.
I decided I wanted to make a little pillow case with an old tea towel my mom had given me. Tea towels are great to use because they've been washed 1,000,000 times- so their dyes won't run at all. Plus they're super soft.


Microwave instructions:
Simple place in microwave for 4 minutes. This will insure it stays warm for about 4 hours. Place under your bedding 10 minutes before you climb in... you won't regret it!
Xx,
Alex
From summer to fall:

From making my weekly (sometimes daily) trips to my little nursery, I've recently discovered air plants. Don't have a green thumb? These are fool proof! Mist some water on these babies about once a week. Poof, you're done.
I found these wreaths in my dad's shed. Apparently he made a bunch for my mom a long time ago. So I snagged some for our front door.
As always, it's a good idea to plan ahead...
Ingredients:
- Wreath
- Fishing Wire
- Scissors
- Air plants

This was a very simple process. I just chose where I wanted to place the air plants and tied them onto my wreath. Easy peas-y.


My front door may not be pretty, but at least there is a wreath!
Xx,
Alex
Little Buffalo
Changing minds

It took me a little while to get into the whole buffalo skull on your wall trend. Actually, I didn't care for them until I found one hidden in my dad's barn. There it hung on a rusted nail, covered with an inch of dust. As soon as I saw it, I was climbing over dressers and rotted lumber to grab ahold of it! That sounds like an exaggeration, but unfortunately it's not. Matt may or may not have rolled his eyes at me once he saw what I was after. (But now it's hung on our wall... and he likes it. Thus, I win.)
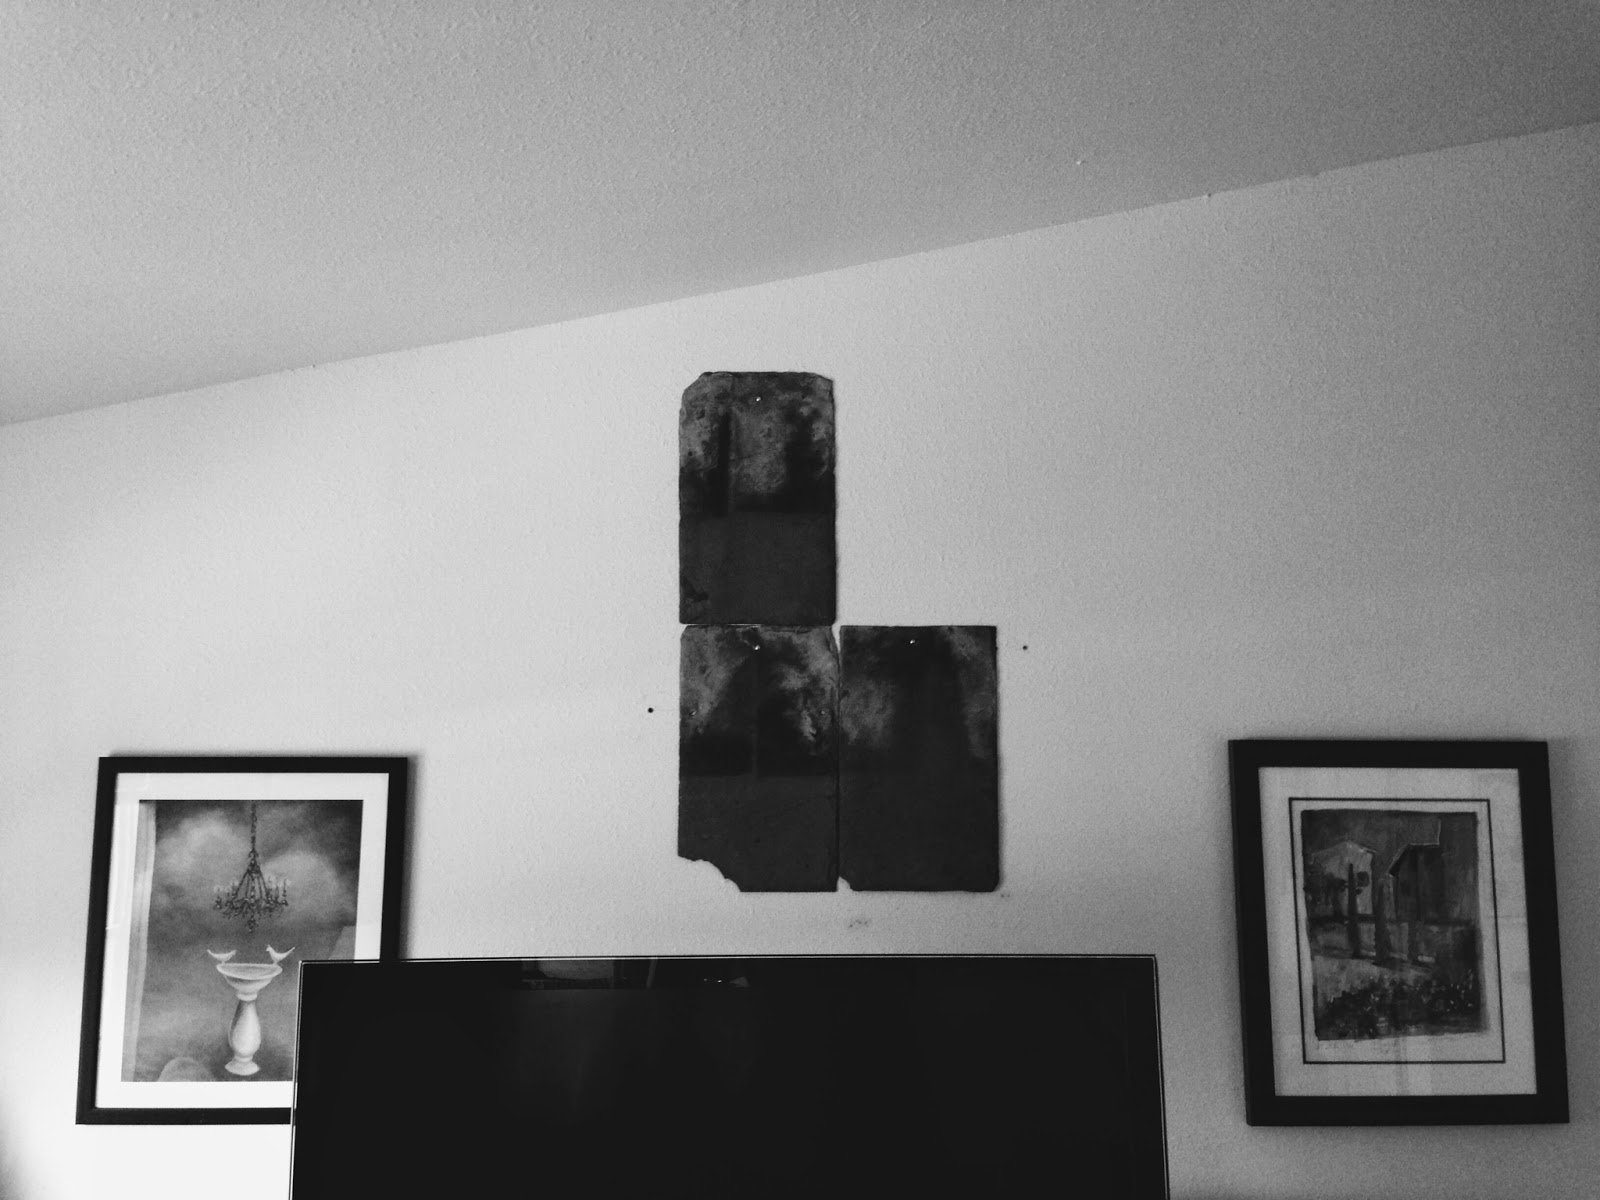
A while ago (who knows how long) my dad snagged a lot of Central High School's slate roofing. The palates have been sitting in the barn as well... When I saw them, I grabbed four pieces and brought them home to St. Louis.
The plan: Hang my buffalo skull on my wall. The dilemma: How?
Ingredients:
- Skull
- Slate or wood
- Hydrogen peroxide
- Water
- 5 gallon bucket
- Drill
- Mollies
- Screws
- Level
- Wire
- Scissors
Before I did anything, I cleaned the skull. I soaked it in a 5 gallon bucket with water and hydrogen peroxide for 24 hours. After that, I let it air dry in the sun for 48 hours.

My clean little buffalo.
We decided to hang the slate behind the skull, this would create a picture-like effect. The skull wasn't in perfect condition, but neither was the slate- so we played the imperfections up.
Grabbing old rags, Matt and I cleaned the slate to show the natural color better. Some were green, some purple, some grey. Neat-o.

Next, my handyman Matt, started drilling holes into our walls. We decided to use mollies, which allow you to hang something anywhere- without finding a stud. Leveling each individual rectangle as he went.


Slate is surprisingly easy to drill through... I wouldn't know. But Matt informed me.


After all of the slate was hung, I wrapped wire around two holes in the skull. The wire then hung on two screws which were drilled into the slate.


Then we were finished! Easy peasy! Now we have a unique center piece in our apartment. All from my dad's barn!


Oh! Look how cute my new coffee table and arrangement is?? I'm in love with these coffee table
books!

Xx,
Alex
Decorated Gourds (for the fall)
Needless to say, now that we have finished Game of Thrones... I've got a little extra time on my hands. I try not to add up the hours I've sat on my couch watching HBO Go. Instead of thinking about the Red Wedding, I think of little things I can do around my house to keep me occupied.
If you know my family at all... well if you know my dad at all, you know he likes to collect things. He has about 1,000+ square feet of things he has collected. And they just sit. So this past weekend, I took it upon myself to give some of these knickknacks a space of their own.
My dad had great dried up gourds, everywhere. I don't know how many years these gourds have been sitting. But they were great. (And free for me!) According to my mother, to dry a gourd you just need to sit it inside and it will dry up naturally. How odd.
Last night was a perfect night to sit outside and craft. Matt had his hookah going and the pups were at our feet. Not to mention with fall weather calls for a fall (ish) craft.

Ingredients for decorated gourds:
- Dried up gourds
- Shellack
- Old paint brush (I threw mine away at the end)
- Dish soap
- Old rag
- Embroidery Thread
- Scissors
First and foremost, you have to pick your gourd. I chose mine based on shape and color. I liked the spotting and curves of my gourds.

Since my gourds had been sitting in a shed for probably about 12 years, I decided to lightly clean them. Although, this is a good idea for anyone who is thinking about doing this project. I dampend wash rag and applied a bit of dish soap to the rag. Once the gourd was clean, I just let it air dry.
To help preserve the gourd, I applied a thin layer of shellack. When the shellack was tacky but almost dry, I started with the embroidery thread. This keeps the start spot in place. No knots needed.

When I was done with one color, I just tied a small knot to the next color! You could just apply some more shellack to start a new color, but I sort of liked the knotted look.

When you're finished, simply add a dab of shellack to tie it off! Yet again, a simple and easy little project.


Xx,
Alex
creating a coat rack
Hi all!
Coat Rack Ingredients:
- Wood
- Drill
- Screws
- Hooks
- Stud finder (or the ability to find a stud)
- Tape measure
Yesterday, we went to a lumber shop, and found some great wood to create a coat rack with! We didn't really know what to expect when we entered the lumber shop. However, we were pleasantly surprised by the owner's helpful attitude! I immediately, went for the Bocote wood. It had great color, knots, and design. And what do you know, it's one of the more expensive types of wood. Go figure. BUT it was just so beautiful, we couldn't pass it up!


 Making an apartment feel like home isn't really that difficult, if you have the time. Matt and I had this huge empty wall to fill, but we didn't know quite what to put on it. Spending $$$ on a large piece of art was not an option; so we opted for plan b, bookshelves.
These bookshelves are perfect because they're simple and inexpensive. They were great for us because we have a lot of things that don't have homes yet. We keep moving things around waiting for it to have the perfect spot, but I believe these things have found their home!


Bookshelf ingredients:


After we finished browsing at the lumber shop, we headed to Lowe's to pick out some hooks! We both wanted black, such a quick decision (if only we could decide what to eat that quickly)!
Matt and I decided it would be most beneficial if we hung the wood behind the front door. Furthermore, since it's our front door, it will always be visible! We decided we wanted ours hung horizontally, but you could definitely hang it vertically- that would be a great twist to the average coat rack.
A nice thing about Bocote wood, is it doesn't need to be stained or a polyurethane placed on it. Actually, it doesn't really absorb stain, so you're really just wasting your time! This was a major plus for me... I could hang it that much quicker!
Next, we measured. I don't mind things a bit organically different, however, Matt prefers to go the more exact route.
Four hooks were placed every foot. We wanted more of a statement piece, so we decided to keep the wood rather long. Because we decided this was going to hold coats, hats, purses or whatever; we knew it needed to find a stud. I didn't think our apartment manager would enjoy a huge dry wall hole in the wall.
Matt did the honors of drilling the holes. We are still learning things... but apparently Bocote wood is also very dense. I don't think I've ever heard him grunt more trying to drill into this tiny piece of wood! Our poor neighbors!
After that, the coat rack was hung! It was a relatively simple process! It also helps if you've got someone to use a power tool. Thanks to the little lumber shop, our apartment is feeling a bit more homey. Matt got to buy a power drill and I got to hang up my purse, what a compromise.
Xx,
Alex
The Little Bookshelf That Could
Love is in the details

These bookshelves are perfect because they're simple and inexpensive. They were great for us because we have a lot of things that don't have homes yet. We keep moving things around waiting for it to have the perfect spot, but I believe these things have found their home!

^^This one is actually zebra wood (we are making more bookshelves with this one). ^^

Bocote wood
When we bought wood at our little lumber shop for the coat rack, we went ahead and picked up extra to make bookshelves. They're simple, affordable, and cute. How perfect is that?

Bookshelf ingredients:
- Drill
- Drill bit
- Stud finder (or the ability to find a stud)
- Screws
- Wood (we chose Bocote Wood)
- Measuring tape
- Level
- Shelf bracket
- Spray paint (optional)
First and foremost, we wanted to spray paint our brackets black. We did this a day before, however as long as you wait until they're no longer sticky, you probably don't need to wait that long.


Deciding where you want to put the bookshelves was our biggest dilemma. We thought we wanted them above our kitchen wall... however the studs do not exist. We spent a lot of time trying to make that spot work; but if there is no stud, it's just not going to happen. So we chose Plan B, our bedroom!

(Can you say scruff?)
Once we (happily) found the studs in our bedroom, we started to drill away. Well, Matt started drilling away.
First, we drilled the brackets on to the appropriate spot. When we got the first screw in, we wanted to make sure the bracket was level. There is nothing worse than a slanted shelf! After both brackets were level, we placed the wood on top and penciled in where the appropriate holes were.

When the little holes were penciled in, Matt took the drill bit and drilled holes. This is important to do with wood, so you don't split it with the screws. Be careful not to go through the wood though! Then, we placed the wood back on the brackets and screwed it into place!

We wanted two to fill up our large space. However, it could be a great statement piece with one extra long shelf. But, I would recommend another bracket.


Bocote wood is so pretty!

The finished product!


Matt's favorite animal is a moose. How great is this old leather bookend?

My friend Chelsea made this for our wedding. It's one of my favorite lyrics and the map is of the two places Matt and I have lived. What a perfect gift.

I love my trinkets. This one is from my dad... to keep the mice away. Trinkets are my hidden treasures. Matt makes fun of me, but I believe love is in the details.
Xx,
Alex
No comments:
Post a Comment