Tuesday, May 20, 2014
Raw: Green Juice For Beginners

So, Matt and I juice. A lot. I've decided to start sharing some
recipes of our "go to juices". Honestly, it's only just now that
we've started creating recipes; we usually just toss all the
left over veggies/fruit of our fridge into the juicer.
We use a masticating juicer. This type of juicer allows for
all of your greens to be properly juiced. It is also a slower
process because it's pressing the juice out instead of using
heat and a blade (as a centrifugal juicer will).
This is a great green juice. It makes 3 cups, enough for two
.
Ingredients:
- 1 1/2 C Kale
- 1 1/2 C Collard Greens
- 1 C Spinach
- 2 head Broccoli
- 4 large Carrots
- 1 small Granny Smith Apple
- 1 Orange- skin off
- 1 Grapefruit- skin off
- 1 lime- skin on
And juice!

So, Matt and I juice. A lot. I've decided to start sharing some recipes
of our "go to juices". Honestly, it's only just now that we've started
creating recipes; we usually just toss all the left over veggies/fruit of
our fridge into the juicer.
We use a masticating juicer. This type of juicer allows for all of
your greens to be properly juiced. It is also a slower process because
it's pressing the juice out instead of using heat and a blade (as a centrifugal
juicer will).
- With juicing you don't need to take out seeds, skin (unless it's oranges and
grapefruit- you can leave them on but your juice will be very bitter), stems, etc.
- Juice leafy ingredients first and citrus last- the citrus pushes the greens through.
- Clean your juicer asap after.
- If you have a masticating juicer you can leave the juice in the fridge for
- Juice leafy ingredients first and citrus last- the citrus pushes the greens through.
- Clean your juicer asap after.
- If you have a masticating juicer you can leave the juice in the fridge for
about 30 hours. We juice at night and then grab it for breakfast the next morning.
If you have a centrifugal juicer, drink immediately.
- We use a strainer (provided with our juicer) to prevent excess foam and pulp.
- Don't know what to do with your pulp???? Try making veggie stalk, putting it
- We use a strainer (provided with our juicer) to prevent excess foam and pulp.
- Don't know what to do with your pulp???? Try making veggie stalk, putting it
in breads, or composting!


Xx,
Alex
Wednesday, March 26, 2014
Golden Milk
Why has it taken me so long to discover turmeric? I'm not sure, but I'm glad I've finally found it. If you haven't eaten turmeric (chances are you have and you don't know it. It provides the yellow tint in curry), or haven't heard of turmeric... you can do your homework here. This anti-inflammatory spice is basically the super root and your body will thank you for consuming it.

You can put it in just about anything to get all the health benefits (stir fry, rice dishes, meat, juice, teas). Lately, I've enjoyed using it in a drink called Golden Milk. Golden Milk is an Ayurvedic drink that's a great for bedtime because it helps digestion and create a peaceful slumber (turmeric can also help with insomnia).

Ingredients:
- 1 Cup Milk (I use whole cow's milk, but you can substitute it for any type)
- 1 Tsp. Turmeric
- 1/2 Tsp. Cinnamon
- Honey to taste


Directions:
Bring the milk to a soft boil
Stir in turmeric and cinnamon
Place honey in your teacup
Pour golden milk over honey

Enjoy!
Xx,
Alex
Monday, November 4, 2013
Apple Butter!
Apple of my eye

As you know, I've just recently found out how to properly use a mason jar. Did you know, they were created for an actual purpose? Not just for sipping whiskey and coke. I know, I know, I was shocked about that too.
I decided to utilize these mason jars by making apple butter! You cannot tell me that apple butter does not scream fall. Top it off with some warm, homemade bread and you'll be one happy camper.
With fall being in full bloom (too ironic?), the apples are among us. I challenge each and every one of you to utilize this season to do something with fresh apples! Pies, tarts, jams, juices- anything. Just stop passing them by or it'll be too late!
Ingredients:
- 6 quarts of diced apples: I mixed granny smith and fuji
- 2 3/4 cups sugar: If you decide not to use tart apples, don't use as much sugar
- 2 3/4 tsp. cinnamon
- 1/4 tsp ground cloves
- 1/8 tsp. salt


Start out by peeling and dicing all of the apples. This helps if you've got an awesome friend (or a reluctant husband) to help! This is by far the most labor intensive part of the recipe. After this is finished, it's cake.
Next, put apples in your largest cooking pot. Drizzle the spices and sugar over the apples. Cover and cook on high for about 4 to 5 hours. Stir occasionally with a whisk.
You'll know your apple butter is complete when it's dark in color and becomes thick. To jar your butter, click here.


As you know, I've just recently found out how to properly use a mason jar. Did you know, they were created for an actual purpose? Not just for sipping whiskey and coke. I know, I know, I was shocked about that too.
I decided to utilize these mason jars by making apple butter! You cannot tell me that apple butter does not scream fall. Top it off with some warm, homemade bread and you'll be one happy camper.
Ingredients:
- 6 quarts of diced apples: I mixed granny smith and fuji
- 2 3/4 cups sugar: If you decide not to use tart apples, don't use as much sugar
- 2 3/4 tsp. cinnamon
- 1/4 tsp ground cloves
- 1/8 tsp. salt


Start out by peeling and dicing all of the apples. This helps if you've got an awesome friend (or a reluctant husband) to help! This is by far the most labor intensive part of the recipe. After this is finished, it's cake.
Next, put apples in your largest cooking pot. Drizzle the spices and sugar over the apples. Cover and cook on high for about 4 to 5 hours. Stir occasionally with a whisk.
You'll know your apple butter is complete when it's dark in color and becomes thick. To jar your butter, click here.


Enjoy with ease!
Xx,
Alex
Friday, October 18, 2013
Making Spices
Drying your herbs:
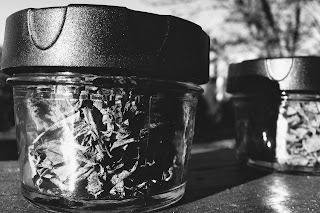
How many spices do you have on your shelf that have been there for more than six months? Well they're just taking up unnecessary space because spices only hold their oils for roughly six months! Crazy, huh?
A couple of weeks ago, I came across an excess amount of fresh basil. I didn't want to waste it, so I decided to dry it and use it for my spaghetti sauce! The process was actually super simple and not labor intensive at all.
Ingredients:
- Spice container
- Spice
- Knife
- Cutting board
If you're picking your own spice, you'll want to read up about the proper way to harvest. We just cut the whole stock of the basil plant (we had that much). But if you're just harvesting a few leaves of basil, you'll want to prune it right above a set of leaves . Pruning is very important for the plants health. Try to not let your basil flower.
But if you have flowers, you'll want to get rid of them before you eat the plant!

After that, you'll just spread your leaves out and wait for them to dry. I just laid them on a paper towel on my kitchen countertop. These need to stay there for at least three days and probably no longer than one week. (Another way to dry would be to bundle the stems and hang the herb upside down! This is a very effective way of drying.)


After you feel they're dry, you just cut them up and put them in your spice jar! Simple as that! You can also experiment and dry different herbs to make tea!


How many spices do you have on your shelf that have been there for more than six months? Well they're just taking up unnecessary space because spices only hold their oils for roughly six months! Crazy, huh?
A couple of weeks ago, I came across an excess amount of fresh basil. I didn't want to waste it, so I decided to dry it and use it for my spaghetti sauce! The process was actually super simple and not labor intensive at all.
Ingredients:
- Spice container
- Spice
- Knife
- Cutting board
If you're picking your own spice, you'll want to read up about the proper way to harvest. We just cut the whole stock of the basil plant (we had that much). But if you're just harvesting a few leaves of basil, you'll want to prune it right above a set of leaves . Pruning is very important for the plants health. Try to not let your basil flower.
But if you have flowers, you'll want to get rid of them before you eat the plant!

After that, you'll just spread your leaves out and wait for them to dry. I just laid them on a paper towel on my kitchen countertop. These need to stay there for at least three days and probably no longer than one week. (Another way to dry would be to bundle the stems and hang the herb upside down! This is a very effective way of drying.)
Day 1

Day 2

Day 3

Day 4

Day 5


Xx,
Alex
Homemade Canned Spaghetti Sauce!
A little taste of summer:

I know... I know... It's fall- start doing fall things and stop doing summer things. But I can't seem to let summer go juuuust yet. Is it me? Or does it feel like fall is going by rather quickly? I mean, if I'm honest with myself, I shouldn't be canning fresh tomatoes... but if they're still growing, I'm still canning.
However, for our wedding we were given a dutch oven. If you've never used one of these babies, GO BUY ONE! Not to mention, they're the perfect chili pot (see, that's fall-ish).
So, I came across an abundance of freshly picked tomatoes, and had to make some spaghetti sauce.
Little side story: before I came to college, I wasn't aware spaghetti sauce came in a jar. My parents had always made it homemade... I didn't know the other stuff existed. It was a blessing and a curse: I've had great sauce all this time... but now I'm too snobby to accept it in a jar... Actually, I'm sure if you were to serve it to me, I probably wouldn't notice.
Back to the point. So I made this great spaghetti sauce and then I learned how to can it! It's a super, quick and easy way to can- trust me. The label on the mason jar made it look WAY more complicated than necessary. Let me tell you how!
Ingredients:
- Tomatoes
- 1 Onion
- GARLIC
- Italian seasonings- parsley, oregano, basil
- Salt
- Pepper
- Olive oil
- Meat (optional)
- Canning jars (yes, the real purpose for mason jars)
- Water to boil
- Dishwasher
- Tongs
- Clean/damp rag
Forewarning: I tend to go more by taste than by measurements. So nothing is exact. I can tell you, however that I used a WHOLE lot of garlic... and it is delicious.


To begin, you first need to dice your garlic, tomatoes and onions. I don't mind the skin in my sauce. If that isn't for you, just blanch your tomatoes prior to simmering.
It's optional to put meat in, I didn't- but if you do, go ahead and brown your meat in a separate pan.If you're not using meat, use a little more olive oil to get some more fat.
 Next, brown onions. Once this is complete, toss everything into your biggest pot. (This is where my dutch oven comes in handy!)

Simmer your sauce with the lid off. This can take over an hour. Just be sure not to burn the bottom of your sauce!


 While you're simmering your sauce, place the mason jars in the dishwasher. Boil a pot of water and place the flat lids within the pot.
Once the jars are on the drying cycle (and your sauce is complete), take one jar out at a time.
 Fill up your mason jar with your sauce. Quickly and thouroughly clean the rim of the jar with your rag. It's necessary for it to be completely cleaned. Don't skimp on this step or it will not clean. Once you've cleaned the rim, simply withdraw the lid from the boiling water and screw it on!

It's important for EVERYTHING to be hot. Jars. Sauce. Lids. Everything.
It will take about an hour for the jars to seal. You'll know they're sealed when the lid is popped inwards. And that's it! It's a super easy way to can, you don't need a pressure cooker or a whole lot of time! Fun, fast and easy.


I know... I know... It's fall- start doing fall things and stop doing summer things. But I can't seem to let summer go juuuust yet. Is it me? Or does it feel like fall is going by rather quickly? I mean, if I'm honest with myself, I shouldn't be canning fresh tomatoes... but if they're still growing, I'm still canning.
However, for our wedding we were given a dutch oven. If you've never used one of these babies, GO BUY ONE! Not to mention, they're the perfect chili pot (see, that's fall-ish).
So, I came across an abundance of freshly picked tomatoes, and had to make some spaghetti sauce.
Little side story: before I came to college, I wasn't aware spaghetti sauce came in a jar. My parents had always made it homemade... I didn't know the other stuff existed. It was a blessing and a curse: I've had great sauce all this time... but now I'm too snobby to accept it in a jar... Actually, I'm sure if you were to serve it to me, I probably wouldn't notice.
Back to the point. So I made this great spaghetti sauce and then I learned how to can it! It's a super, quick and easy way to can- trust me. The label on the mason jar made it look WAY more complicated than necessary. Let me tell you how!
Ingredients:
- Tomatoes
- 1 Onion
- GARLIC
- Italian seasonings- parsley, oregano, basil
- Salt
- Pepper
- Olive oil
- Meat (optional)
- Canning jars (yes, the real purpose for mason jars)
- Water to boil
- Dishwasher
- Tongs
- Clean/damp rag
Forewarning: I tend to go more by taste than by measurements. So nothing is exact. I can tell you, however that I used a WHOLE lot of garlic... and it is delicious.


To begin, you first need to dice your garlic, tomatoes and onions. I don't mind the skin in my sauce. If that isn't for you, just blanch your tomatoes prior to simmering.
It's optional to put meat in, I didn't- but if you do, go ahead and brown your meat in a separate pan.If you're not using meat, use a little more olive oil to get some more fat.


Simmer your sauce with the lid off. This can take over an hour. Just be sure not to burn the bottom of your sauce!


Once the jars are on the drying cycle (and your sauce is complete), take one jar out at a time.


Your lid needs to be this clean!
It will take about an hour for the jars to seal. You'll know they're sealed when the lid is popped inwards. And that's it! It's a super easy way to can, you don't need a pressure cooker or a whole lot of time! Fun, fast and easy.


But then you have to clean :(
Xx,
Alex
Wednesday, October 9, 2013
chocolate chip cookies- enough to share!
It's never the wrong time for cookies:

So, I was writing my "thank you notes" and my aunt had given me a gift card to Bed Bath and Beyond. You know, that store that you go into and they try to get you to buy everything you never knew you needed? They're super friendly, don't get me wrong... but no! I don't want to buy the item of the day at the cash register... just let me buy my over priced juicer. Anyway, so I was writing my thank you's and I had mentioned I was going to buy a mixer with her gift card. THEN, she sent me her famous chocolate chip cookie recipe! They're so good, she used to sell them! You've all been waiting patiently... So here they are!
Ingredients:
- 1 C Butter
- 1 C Peanut Butter
- 1 C Sugar
- 2 Eggs
- 1 tsp. Vanilla
-- 2 1/2 C Flour
-- 1 1/2 Tsp Baking Soda
-- 1/2 Tsp Salt
--- 12 oz. semi- sweet chocolate chips (Hershey's)
--- 12 oz. semi- sweet chocolate chips (Nestle)
With a mixer (my first time using my beautiful Kitchen Aid!!!) Blend together the first section (-).


In a separate bowl, blend together your dry ingredients (--). Then combine the two.

Finally, mix in your chocolate chips.


Place in oven for 18-20 minutes at 350 degrees. However, once they started to become golden, I'd take them out. Let them sit on the cookie sheet for about 3 min. Then, transfer them onto a wire drying rack.
These make a large amount of cookies. Too many for Matt and I to eat, so we froze some of our dough! And, the dough tastes much more like peanut butter than the baked cookie does!


So, I was writing my "thank you notes" and my aunt had given me a gift card to Bed Bath and Beyond. You know, that store that you go into and they try to get you to buy everything you never knew you needed? They're super friendly, don't get me wrong... but no! I don't want to buy the item of the day at the cash register... just let me buy my over priced juicer. Anyway, so I was writing my thank you's and I had mentioned I was going to buy a mixer with her gift card. THEN, she sent me her famous chocolate chip cookie recipe! They're so good, she used to sell them! You've all been waiting patiently... So here they are!
Ingredients:
- 1 C Butter
- 1 C Peanut Butter
- 1 C Sugar
- 2 Eggs
- 1 tsp. Vanilla
-- 2 1/2 C Flour
-- 1 1/2 Tsp Baking Soda
-- 1/2 Tsp Salt
--- 12 oz. semi- sweet chocolate chips (Hershey's)
--- 12 oz. semi- sweet chocolate chips (Nestle)
With a mixer (my first time using my beautiful Kitchen Aid!!!) Blend together the first section (-).


In a separate bowl, blend together your dry ingredients (--). Then combine the two.

Finally, mix in your chocolate chips.

Use an ice cream scoop to pack your cookie dough.


Even Captain wanted to help... Notice him licking his lips?

These make a large amount of cookies. Too many for Matt and I to eat, so we froze some of our dough! And, the dough tastes much more like peanut butter than the baked cookie does!


Enjoy!!
Xx,
Alex
There's enough sweetness for everyone:

I'm currently in an awkward transition. I couldn't be more excited for fall; yet I want to hold on to summer. So as I make my gourds for fall, but I also brew sweet tea for summer. I mean... it may be fall, but it's still 80 degrees outside. So that's justifiable, right?
The Tabor family is kind of famous for sweet tea. Growing up, that's all I had. My mom had the perfect recipe. You may be thinking, "how hard is it to screw up sweet tea?" Well, it's easy to make bad tea. Actually, we could always tell if my mom had made tea or if it was my dad. No offense to my lovely father, but he didn't have the magic touch.
As I've grown older, I have started to appreciate different types of tea. It's come to the point that I actually prefer other teas over sweet iced tea. Currently, my go to is Early Grey; but I love a good Moroccan Mint, too.
But then, I came home one day and my mom had changed up her recipe for sweet tea. It had a bit of a twist to it, and I liked it. This is what she did:
Ingredients:
- 2 lipton black tea bags
- 2 earl grey tea bags
- 1 spearmint tea bag
- 1/2 cup sugar
- pitcher
- water (one) 1 quart and (one) 3 quarts
I enjoy this tea a lot because of the earl grey and spearmint... they add an unexpected twist to the normal sweet tea.

Like any type of tea, you first need to fill up your water to boil it. Some put it in the microwave, but personally, I think that's cheating. I like to boil mine on the stove. Since you don't want to be a cheater, put about 1 quart of water on the stove to be boiled.

Don't forget about your tea! I cannot tell you how many times I've let water boil out... I've come to the point that I almost need to set a reminder on my phone that I'm boiling water! Fire hazard right here.

Once the water was boiling, take the water off the burner and brew the tea under a plate. Allow this to brew for 15 minutes.

Next comes the sugar. My mom actually puts more sugar in, but McCallister's kind of ruined sweet tea for me, so I tend to make mine a little less sweet.

(Thanks to my awesome friend, Natalie, for these super cute measuring cups!)

After 15 minutes, take out the tea bags. You don't want bitter tea! Then simply add the tea into the sugar (which is in the pitcher). This is important to do while the tea is still hot. If you let your tea cool too much, the sugar will not dissolve. There is nothing worse than ordering ice tea and adding your sugar while there is ice in the cup! It's just not going to work.
Next, mix and add 3 quarts of warm water to the pitcher. This can be less or more water, depending on how strong you like your tea.

And then put in the refrigerator to cool! It's perfect and great!
Xx,
Alex
No comments:
Post a Comment